
 I’ve been asked many times over the years how I mounted the various displays in my car. I’ve shared photos of a few setups on my other website and in YouTube videos, but I had not shared details on which mounts I chose or how they work. If I jump to the end of the story, I’ll say that the backbone of all of my mounts begins with different mounts from ProClipUSA. They split their products into two main sections: mounts for your car and mounts for your devices. Find a mount for your car first because they’re not going to stock anything specific for your radio. The radio attachment will have to start from a different direction. I’ll go back to the beginning to explain my journey.
 Icom’s ID-5100 and ID-4100 mobile radios come with an intuitive magnetic mounting scheme. I like it! When I first bought my GTI, I chose to mount my Icom ID-5100A display down by the gearshift because I had become accustomed to having my smartphone mounted high on the dash. The display location certainly made for a good photograph, one that combines ham radio, the GTI (Plaid seat), and a manual transmission. But it was not ideal for convenient operating. Eventually, I decided move my smartphone, which freed some real estate on my dash, and used my existing ProClip mount to hold the 5100 display in a more visible location (see photo below).
 I liked the improved visibility! Yes, it blocked an air vent, but it hadn’t proven to be a significant problem. The center vents can be controlled individually. So I didn’t worry about overheating the display or creating condensation inside. I think the higher position is better for GPS reception, too. When it was mounted near the gearshift, I would occasionally bump the display when shifting into 1st, 3rd, or 5th gear. That’s no longer a problem. Other than decreased cooling for me on really hot days, I cannot think of any other problems with having my display here.
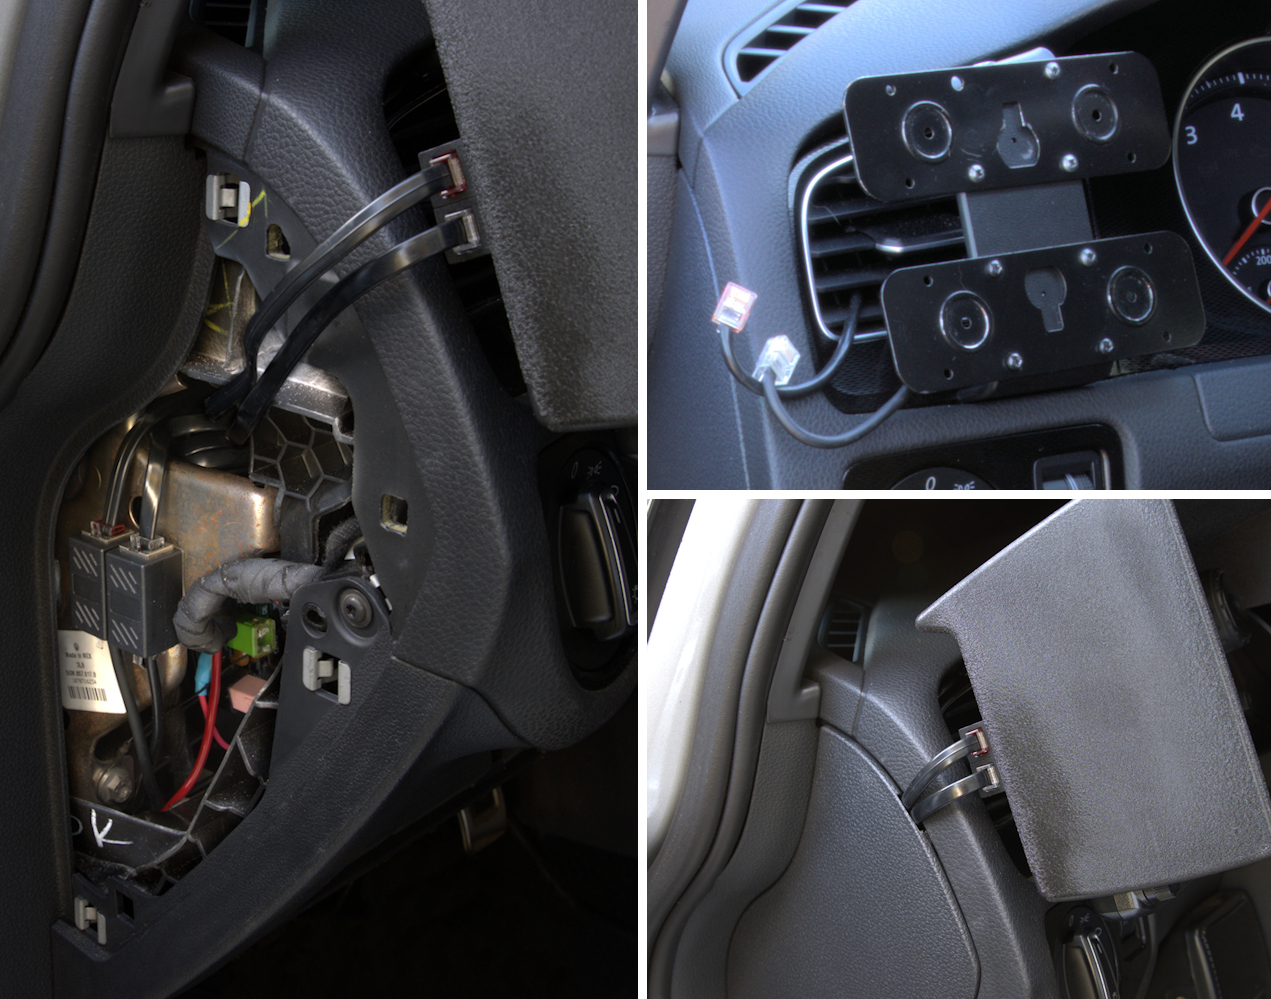
 I like my installations to be as clean as possible. I chose to route my display cable through the ventilation duct. That meant dismantling the dash so that I could route the data cable behind the trim and out of an air vent. To get the cable up and through the air vent, I had to remove all center console trim, the infotainment display, and the air vents. It was time-consuming, but I think worth it in the end. I’ve shared a photos in the album below.
 Here’s a look at Icom’s MBA-2 mounting plate. ProClip mounts have AMP format starter holes in the face that match the MBA-2 mounting holes. I used tiny screws from ProClipUSA to attach the MBA-2 to the ProClip mount. I added a touch of Goop adhesive to help the mount stay attached to the dash when I have a heavy tablet mounted. Removing the display at hotels, parking structures, or other suspect areas is a snap. I can also tuck the cable into the air vent to hide it.
 Eventually, I decided to mount a second transceiver along with the first. Two radio displays would impede my view of the infotainment system. So, I created a combined mount and moved everything over to the driver’s side air vent. That meant disassembling the dash again so that I could remove the 6P6C display cable and replace it with a USB-C cable for my phone (I put the phone back on the center vent). One MBA-2 magnetic mount is not strong enough to support two radios. So, I added a second magnetic mount and a touch of Goop adhesive for additional strength. See details in the photo below.
 Running the display cables through the side vent was tidy, but eventually created a problem. You see, I probably disconnect and reattach my displays more frequently than average. Eventually, I wore out one of my RJ12 connectors. Sure, it can be fixed, but the work required disassembly of the vent to fish out enough cable to effect a repair. With serviceability and longevity in mind, I decided to bypass the vent by installing a female-to-female 6P6C connector and a pair of 12-inch sacrificial cables so that future repairs would be faster and easier, thanks to the spare cables that I carry in my EDC box. I filed a small notch in the factory trim panel. This panel is completely invisible when the driver’s door is closed. I liked the new setup better because there’s less exposed cable to be seen.
 I’m told that I bury the lede by not talking about the “visor” that I created for my upper displays. I wanted a compact display holder that would shield my displays from direct sunlight and provide a fast, convenient way to remove the displays, particularly when parking in unfamiliar areas or when leaving the car unattended for extended periods. I made the visor by cutting-up a 5×7 index card box and painting it with wrinkle paint for additional texture. This photo shows the back of the box, its mounting magnets (MBA-2), and 6P6C adapters. The inside of the box has the FT-857D’s display mount and an MBA-2 steel plate for the ID-5100. It’s not a perfect cover for both radios, especially with the large ID-5100 display, but it was a fast and easy purchase that works well. 🙂
 The third ProClip mount is for my center console. This is where I mounted my FT-891 and associated accessories. This is a strange contraption that’s formed by a combination of a side mount that’s specific for my car, some extensions, and mounting adapters that feature the AMP hole pattern. I attached the mounting adapters with either Goop or two-sided tape since the AMP holes don’t line-up with where I wanted each device to ride. This setup allows me to remove all FT-891 components within a minute.
 Eventually, I decided to move all radio displays to the center of the car. My goal was to put the displays on the same mounting adapter for easy removal when parked. The center mount is holding a lot of weight now. So, I supplemented its hold with Goop adhesive. The combination of displays jiggles a little over bumps, but it’s an otherwise sturdy solution. An unexpected benefit of clearing the left side ventilation duct was that it had the effect of having a new air conditioner! 😉 I had forgotten how much air flows from that vent and what a difference it would make to open it again. See the photo album below for a view of the setup without the desk installed.
 One last detail, since I’m sure it will come up, is my tablet setup on the steering wheel. I’m using an 8-inch Galaxy Tab A on a strap mount; plus, a small desktop that rests on an inverted steering wheel (my flat-bottom steering wheel won’t hold the desk when upright). This setup is excellent for POTA or unplanned radio sessions that require some log work. Let me know if I’ve missed anything. I’m happy to provide more detail. See the photo album below for more details, including photos of the ProClip mounts before I attached accessories to them. In fact, I later decided to share even more detail to help a local ham with her radio installation. See that article HERE.
Yes, I’m a nerd! 😉
Scott


Awesome content! I’m looking at a ‘stealth BMW’ build, and this has bene hugely instrumental. VA3 ICH in Toronto.
Thanks a ton! And have fun with your build. 73! Scott